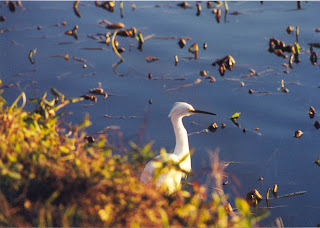

Wetland management techniques focus on manipulating water levels to have desired effects on wetland plant communities. Wetlands are dynamic systems. Therefore, wetland management must also be dynamic and often requires professionals to identify the individual and changing management needs of a wetland. Management is a continuous, variable, and dynamic process. However, the basic techniques of wetland management are relatively straight forward. The goal of wetlands designed the way I’ve described in this post is to grow annual plants which will produce large amounts of seeds that provide a valuable food source to many wildlife species, especially dabbling ducks such as mallards, wigeon, gadwall, and teal. Annual plants respond favorably to wetlands which gradually dry out during the spring and summer months and to soils that are periodically disturbed. Therefore, water level manipulation and disking are the 2 most common and useful wetland management tools.
In our part of the state, the most beneficial time to begin releasing water from a wetland is late winter to early spring when soil temperatures reach about 60 degrees F. Valuable plants such as pink smartweed respond favorably to this early drawdown. However, if drawdown is delayed until mid-spring to early summer, desirable plants such as barnyard grass will grow rapidly. Regardless of the timing of drawdown, drawdown should be made slowly, often taking up to 1-2 months to completely drain.
 Once the wetland is dry, mowing and burning can control undesirable plants such as cocklebur, sumpweed, or sesbania and encourage more beneficial food plants. Mowing and burning can also reduce heavy stands of rushes, sedges, and other species that can take over an area and crowd out other plants. Once monocultures and undesirable plants become established, mowing and burning will become only temporary fixes and require follow up treatments at least once a year. Disking can also be used to reduce perennial species and increase seed producing annuals. Disking is usually only recommended every 3-4 years.
With proper water level manipulation and soil disturbance, an abundance of native plants and seeds can be produced to attract migratory waterfowl. This method is recommended over planting crops such as corn, milo, soybeans, and rice. However, if a crop is desired, choose Japanese millet. The first step in growing Japanese millet is to obtain a soil analysis for the area to be planted. Contact NRCS or the Texas AgriLife Extension county offices for assistance submitting and interpreting results. Disk and harrow to prepare a good seedbed. Blend the seed with the fertilizer and broadcast over the field at a rate of 20lbs/ac. Because Japanese millet can produce mature seed in 60 days, it is recommended to plant from July 1 to August 15 so that the seeds are mature as late as possible prior to the first frost. An alternative seeding method for Japanese millet is to delay drawdown until mid- or late summer and then quickly reduce the water level to expose wet mudflats. Then broadcast the seed and fertilizer at the same rate as above. If you plan to hunt near of over this wetland, be sure to check with a local game warden to be sure you are not illegally baiting ducks through this practice.
At some point, your wetland will be invaded by nuisance plants and animals that should be reduced or eliminated. Cocklebur, sumpweed, and sesbania respond favorably to rapid drawdown in the summer. While a slow drawdown in the late winter and early spring can help to minimize these nuisance plants, mowing or herbicide treatment may be necessary to reduce or eliminate them. Once detected, these plants should be treated quickly to avoid seed production which will increase problems in subsequent years. Because willow or cattail cannot withstand competition, these pest plants are best avoided by producing desirable plants on bare moist soil in late spring or early summer. Since there is often an abundance of bare moist in the first year of a new wetland unit, it may be necessary to plant Japanese millet or other beneficial plant to keep willow and cattail from establishing.
 Beavers can be expected to occupy your wetland project. Beavers often plug water control structure and/or burrow into levees. To keep beavers from plugging your structure, place a pen constructed of cattle panel or similar material around the control structure. Although beavers may still stack material along the fence, it is much easier to remove debris along a fence than it is in a control structure. Nutria are fast reproducing herbivores that can become quickly overpopulated and destroy vegetation within a wetland. They will also clog control structures and burrow into levees. Every attempt should be made to remove nutria from your wetland unit. Feral hogs will also do extensive damage to levees and wetland areas. Hogs should be trapped and shot whenever possible to protect the investment you’ve made in your wetland project.
Remember, wetlands are more than just a place to duck hunt. The collective efforts of creating, restoring, and enhancing wetlands on your properties will have a tremendous impact on water quality and quantity and wildlife habitats.